Sunday, November 29, 2009
updates on the blog
Saturday, November 28, 2009
night time


Friday, November 27, 2009
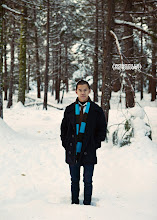
blue or no blue?
Not fixed

Fixed

Wednesday, November 25, 2009
I think I've been thinking to much
Monday, November 23, 2009
Project Upadate/ status


S


Thursday, November 19, 2009
HDR

So i've been looking for a new way to do HDR's when I found this on Gizmodo
Take Your Shots
As mentioned before, you'll get the most bang for your HDR buck with scenes that have both extremely bright and extremely dark areas of interesting detail to bring out. So choosing the right scene is an obvious first step.
1. Set your camera to auto exposure bracketing mode, which takes three (usually) sequential shots at three different exposure levels: one correctly exposed, one overexposed, and one underexposed. You can usually specifiy the amount of exposure stops to under- and overexpose—you probably want the maximum range, which is usually a full two stops in either direction.
2. You want to take the three shots in the quickest succession possible since we'll be merging them later and you don't want moving objects to foul that up. So turn your camera on burst shooting where possible and hold down the button, firing off three quickies without moving. This is where you'll need a tripod for cameras without AEB to keep the shots uniform.
Note: If you can, shoot in RAW. Photoshop can handle RAW files just fine, and the extra exposure information within compared to JPEG will make your HDR images all the more juicy. Also, the more source images you have the better, so if you do have a tripod and are shooting an immovable scene, bringing more than 3 images to your HDR file will only give you more detail to work with.
Create Your HDR Image 3. In Photoshop, go to File -> Automate -> Merge to HDR. Select your three images, click "Attempt to Automatically Align Source Images" if you think they may be slightly crooked, and then hit OK. Photoshop will chew on them for a while and then present you with your 32-bit HDR image.
You may notice that the file you have now doesn't look so hot. That's because a 32-bit HDR image isn't useful in itself unless you have a $50,000 HDR monitor. To look good on your screen and on paper, it must now be "tone mapped" into an 8-bit image that selectively uses parts from each exposure to accurately represent the scene.
4. Before we head to tone mapping, save your HDR as a 32-bit Portable Bit Map file so you can start fresh again if need be.
Tone Mapping Your Image
How you tone map the HDR file determines whether your result will look great or like the aforementioned clown vomit. We're using Photoshop here because it's more closely tuned, in my opinion, to achieving real-world results than HDR-specific software like Photomatix. Here, though, personal taste is everything, so if you like your images more or even less saturated and otherworldly than I do here, feel free to experiment, of course. They're your photos! It also helps to keep an eye on your originals as you're doing this to make sure you don't stray too far from reality.
To become a skilled HDR jockey in the tone mapping department, you'll need to be at least a little bit familiar with two fundamentals of digital imaging that tend to hide in the background for most users—the scary-looking graphs known as histograms and curves, both of which look like they belong in your school text book.
But no need to cower in fear! Watch this video right now to get the basic gist of curves (and also, essentially, histograms).

Now, armed with that knowledge, to tone-mapping!
5. With your 32-bit HDR file open, go to Image -> Mode -> 8 Bits/Channel. This will bring up the tone mapping window, which has four options in the drop-down: Exposure and Gamma, Highlight Compression, Equalize Histogram and Local Adaptation. The first three, to varying degrees, are automatic settings. To say I understand the specific differences between all four would be lying, but I do know this: Local Adaptation is the only one that lets you manually futz with the image curve, giving you the most creative control. Choose that one (but feel free to experiment with the others, of course).
6. Here's where things get kind of abstract. If you watched your tutorial video, you'll know you want to use the eyedropper tool to isolate areas of the image you want to work with, then create an anchor point and move that section of the curve into the ligher or darker area of the graph. You can start with the easiest adjustment, which is dragging the lower-left portion of the curve to where the histogram begins—this will make the darkest parts of your image pure black, which you want for good contrast.

7. Your next goal should be to fiddle with a point higher on the curve to make your whites whiter. So grab a point up there and move it into the top portion of the graph until the whites are to your liking in the live preview.
8. And finally, choose a point in the middle and work the midtones. Again, preference is key, but you'll want something that, in the end, represents a classic S-curve for the best contrast. In the end, you want an image that has black blacks, white whites (but few to zero completely washed out areas), and detail through the midrange. Your image may still look not so good when your curve is done, but that's OK.
9. The last step in the tone mapping process is to mess with the good ol' Radius and Threshold sliders. Again, like many things in Photoshop, I have no idea exactly what's being jiggered here, but these essentially control how HDR-ed out your HDR images will look, if that makes sense. The wrong setting will peg the image's edge detail, resulting in some yucky looking mess. I like to keep a little bit of blown-out highlights in the image too, to remind everyone it's still a photo.

So fiddle with these sliders until the live preview looks good in your esteemed opinion. Again, your image won't look perfect, even now. The object here is to strike the right balance between detail and a natural look.
Toning Your Image
Now you have a good old fashioned 8-bit image that contains some elements of all three of your original source files, tone mapped. The final step is applying some of Photoshop's basic tools used for any photo in order to bring out the most detail possible.
10. First, Levels. Even though you set contrast with your tone curve, you may still be able to fine tune it with levels. So under Image -> Adjustments -> Levels, make sure the black and white sliders are aligned with the left and right edges of your histogram mountain to the extent that it pleases you.
11. Next, Image -> Adjustments -> Shadows/Highlights, one of Photoshop's most magical tools. Here is where the areas of your image that previously looked too dark will reveal their glorious hidden detail. Slowly raise the Amount and Tonal Width sliders under Shadows until the detail comes out, but not too far into ugly boosted-out territory. Do the same for Highlights.
12. And last, Image -> Adjustments -> Hue/Saturation, where you probably want to boost the Saturation just a little bit to get the colors popping to your liking.
Gizmodo.com
Saturday, November 14, 2009
venturea blvd

Wednesday, November 11, 2009
Aaron Ruell
Aaron Ruell


Friday, November 6, 2009
I've been trying to figure out...


Wednesday, November 4, 2009


Project 2 Description
Project Description/ Conceptual Concerns:
Two ideas that I have though of while thinking about this project is that I was driving around the other night going to get food at 1:00am and I noticed on Ventura boulevard that there where a bunch of stores that had gone out of business but yet even though there was nothing in the store they still kept the lights on inside them. It made me think why the lights are on in a store that has nothing in it. Stores that keep their lights on usually have stuff in them so that they leave the lights on so if someone breaks into their store people can see them. But these lonely out of use stores just seemed so sad with their lights on and that it’s almost as if they were longing, begging to be become useful again. If I end up using this project idea then I would just take pictures of these stores that are on Ventura Boulevard. The only problem that I might run into is the fact that so far I have only seen two stores so I would have to go drive and find more stores that kept their lights on at night that had nothing in them. I have seen a many stores that are out of business but they do not keep their lights on at night. The other problem that I might run into is the read of the pictures; I’m not sure how they will read to the view when shown. The second idea that I have is that this is more of a life on going work that I have always thought it would be an interesting thing to try to take pictures of people in my life that I would consider friends, at are just more then an aquatinted, someone that I could actually have a conversation with. So take these pictures all in a similar fashion so that they all tie in together. There will be no back ground to give emphases to the person and not the environment that is around them. There will be more about how I will shoot the project in the technical part of the write up. I know that they type of project has been done before, but I want to try it as a way of document people for my own memory because the mind forgets and photos are a way of helping memories just faces can bring back memories of entire events, that’s what the documentation is going to try and see if it will work out.
Technical Skills:
For the first part the skills that I want to try using is taking an HDR because these pictures will be taken at night so I want to see if I can get any more information out of the picture by taking an HDR. I’ve never really taken an HDR photo so I will have to do some reading about that so I can have a proper looking photo. And then there is always the skill of white balancing the picture so it looks right. For the second idea that I have I would need to get a back drop and learn how to use my flashes that I have better and try to do some what of a studio type lighting set up and learn how to do lighting for these shoots. I figure that would take a great amount of time to figure out how to light things correctly because every time that I have tried to use the flashes in the past it has just given me a headache. I am going to see if I can get my prints to be sharper also when I print them off because they still are not as sharp as I would like them, I learned a good amount about this on the last project but I am going to continue doing this some more to see if I can get the results that I want.
Formal Guidelines:
For the first project with the buildings I would hope to have at least 5- 7 buildings that I could find and there would be one picture for each building. The prints themselves would be about 10x15 prints. The second one idea would be printed 10-12 prints of people. The size of the prints I am thinking that I want to print them out about the size of old albums so around 12x12 prints.
Artist references:
I’m not really sure of any artist that I could use to reference at this time, but I am going to look some up and see if I can find anything.
Readings:
I think that there is going to be a lot of reading for references to research information that will be looking up to figure out how to do HDRs and for the lighting so that I can the images that I want. I was told that there is a blog called strobist that has a lot of information about lighting that I should look up and that it would be very helpful for the information that I am looking for.
Grade:
The project should be graded on if the goals that were set where meet, and that a higher grade should be given if the project meet and surpasses the goals that where set technically and conceptually.
Goals List:
The goals are the same as the last project and that is just to have better printed images and have a better white balance. I would also like to learn more about lighting techniques so that it could help me in the long run.
Sunday, November 1, 2009
panormics


p0ps flickr